VMware VIX API / vmrun

나는 VMware Workstation이나 Fusion을 띄워놓고 VM에 원격으로 접속하는 일이 잦은데

VMware이미지를 제어 할때 꼭 VMware가 설치되어 있는 OS에 먼저 원격으로 접속해야 되어서 번거로웠다.


어떻게 이걸 원격으로 제어 할수 없을까 싶어서 찾아보던 중에

VMware VIX API libraries라는걸 발견했다.


그안에 보면 vmrun이라는 명령어가 있는데

이걸 이용해서 굳이 귀찮게 GUI 를 거치지 않고 터미널 상에서 이미지들을 부팅, 재부팅, 셧다운, 스냅샷제어, 

파일을 vmware로 카피하고 파일을 원격에서 실행하고 데이타를 카피 아웃해 오는 것 등 여러가지 동작을 할수 있다.


vmrun 은 앞서말한 VMware VIX API libraries 에 포함된 유틸리티로, VMware Server 및 Workstation 버전에는 기본 포함되어 있다. VMware Fusion 이나 Player 사용자들의 경우 VIX API 다운로드 페이지를 통해 SDK 를 다운받아 설치하면 된다고 한다.(맥은 /Applications/VMware Fusion.app/Contents/Library/vmrun 에 있고 윈도우는 C:\Program Files (x86)\VMware\VMware VIX\vmrun.exe 에 있음)


상세한 사용 방법은 아래의 URI를 참고하면 된다. vmware.com에 vmrun을 검색해보니 아래 버전외에는 검색이 안되는거 보니 추후버전에는 큰 변경사항은 없을 것 같다.

VMware Workstation 6.5, VMware Fusion 2.0, and VMware Server 2.0 http://www.vmware.com/pdf/vix162_vmrun_command.pdf VMware Workstation 7.0, VMware Fusion 3.0, VMware vSphere 4, VMware Server 2.0 http://www.vmware.com/pdf/vix180_vmrun_command.pdf


[VMware Workstation 기준 간단한 제어 요령]

[Workstation] 부팅: vmrun -T ws start /vm_folder/vm.vmx nogui 재부팅: vmrun -T ws reset /vm_folder/vm.vmx soft 셧다운: vmrun -T ws stop /vm_folder/vm.vmx soft 스냅샷 생성: vmrun -T ws snapshop /vm_folder/vm.vmx my_snapshot suspend : vmrun -T ws suspend /vm_folder/vm.vmx soft

[Fusion] 부팅: vmrun -T fusion start /vm_folder/vm.vmx nogui 재부팅: vmrun -T fusion reset /vm_folder/vm.vmx soft 셧다운: vmrun -T fusion stop /vm_folder/vm.vmx soft 스냅샷 생성: vmrun -T fusion snapshop /vm_folder/vm.vmx my_snapshot suspend : vmrun -T fusion suspend /vm_folder/vm.vmx soft

p.s 스냅샷 관련 기능들은 VMware Player 등에는 원래 없는 기능이기 때문에 당연히 동작하지 않는다. 

그 외에도 VMware 종류에 따라 지원되는 기능의 종류 및 범위가 한정되어 있다는 점도 잊지 말자.


결론) 커맨드라인상에서의 동작을 지원하니 원격에서 ssh로 붙어서 하던, 별도 스크립트나 프로그램을 짜던지 하면 간단하게 원격에서도 vmware이미지를 제어 할 수 있을듯하다.(..는 아마 안 바쁘면 내가 만들거라는 얘기, 혹시 만들면 올릴게요)


http://katselphrime.com/2014/03/16/vmrun/

http://bugtruck.blogspot.kr/2009/02/vmrun-vmware.html

http://www.vmware.com/kr/support-search.html?cc=www&client=VMware_Site_support_center&site=VMware_Site_support_center&cn=vmware&num=20&output=xml_no_dtd&ie=UTF-8&oe=UTF-8&q=Using+vmrun+to+Control+Virtual+Machines#client=VMware_Site_support_center&numgm=4&getfields=*&filter=0&site=VMware_Site_support_center&cc=en&ie=UTF-8&oe=UTF-8&start=0&num=20&cid=&tid=&cn=vmware&output=xml_no_dtd&q=Using vmrun to Control Virtual Machines



Posted by 장안동베짱e :


구글 간편 검색기


가끔 문서 검색할일이 있는데 주로 filetype:pdf검색을 많이 사용한다 

근데 문서가 PDF일수도 있고 ppt일때도 있고 pptx일때도 있고

아니면 파일타입 관계없이 필요할때도 많다


그럴때 마다 filetype: ... filetype:... 을 계속 하기 귀찮아서 검색기를 만들었다.

필요하신분은 수정해서 사용하시면 됩니다.


참고 : http://prattler22.tistory.com/21


Posted by 장안동베짱e :


Doxygen은 C, C++. C#, Objective-C, PHP, Java,Python, VHDL, Fortran, Tcl 등의 소스코드에서 주석을 약속된 문법대로 작성하면 주석을 분석해 HTML 또는 LATEX, PDF 형태로 소스코드를 문서화 해줍니다.

 따라서  Doxygen 을 사용하시면 소스코드의 분석 및 유지 보수에도 도움이 됩니다. 


우선 Doxygen 설치에 앞서 함수 구조도, 클래스 구조도등의 그래프를 무선에 포함시키기 위하여 Graphviz 를 설치하는게 좋습니다.

Graphviz은 http://www.graphviz.org/Download_windows.php 에서 받아 설치하면 됩니다.


다음으로 http://www.stack.nl/~dimitri/doxygen/download.html#latestsrc 에서 OS에 맞는 Doxygen을 다운받아 설치합니다. 


Doxygen의 주석은 /**  */ 모양의 주석 안에 약속된 형태의 태그를 명시하고 그에대한 설명을 추가하는 형식으로 되어 있습니다. 문법에 대한 설명과 팁들을 보려면 공식 홈페이지 매뉴얼http://www.stack.nl/~dimitri/doxygen/manual.html 을 참고하시기 바랍니다.


다음 설명은 doxygen 1.8.2 버전을 기준으로 설명합니다. 


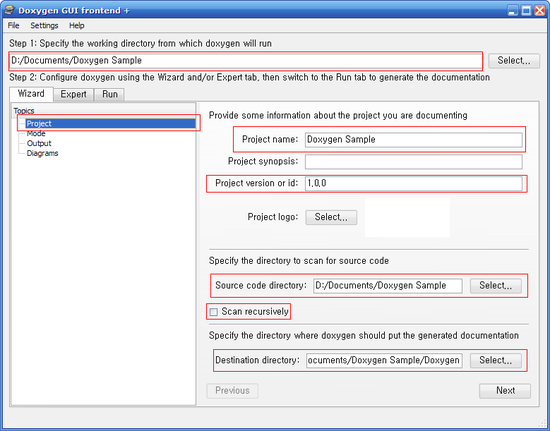
Doxygen-1.8.2 를 설치 후에 Doxywizard를 실행하시면 다음과 같은 화면이 뜹니다. 


[ Wizard >> Project ]


Specify the working directory from which doxygen will run 

프로젝트 루트 폴더를 지정합니다.  이 폴더 안에 소스코드와 Doxygen 결과가 저장될 폴더등이 이안에 있어야 합니다.


Project name
프로젝트 이름을 넣습니다.


Project verion or id
프로젝트 버전이나 다른 프로젝트와 구별할 수 있는 식별 번호를 입력합니다. 정해진 형식은 없으며 자유롭게 입력하시면 됩니다.


Source code directory
소스 파일이 있는 디렉토리를 지정해 줍니다.


Scan recursively
소스 파일이 소스 디렉토리 안에 또 다른 디렉토리 안에 작성되어 있다면, 모든 하위 디렉토리까지 뒤져가면서 문서를 작성할지의 여부를 지정합니다.


Destination diectory
Doxygen이 문서를 어디에 생성할지를 정해 줍니다. 이 디렉토리 및에 자동으로 “html”디렉토리를 생성하므로 Doxygen을 위한 디렉토리만 정해주시면 됩니다.


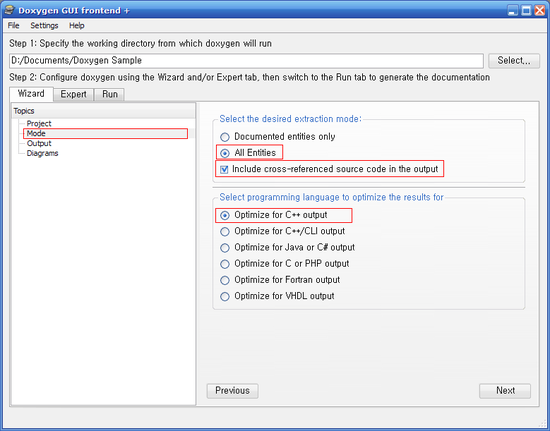
[ Wizard >> Mode ]


Include cross-refeenced source code in the output
이 옵션을 체크하면 각 함수마다 사용한 함수 코드로 바로 Jump할 수 있는 링크를 생성해 줍니다. 


Select progrmming language to optimize the results for

해당 프로그램 언어를 선택하시면 됩니다. 


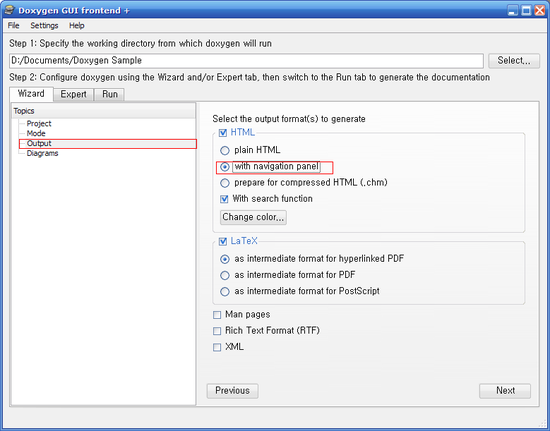
[ Wizard >> Output ]


with navigation panel

출력 형식을 선언하는 것이며 문서 왼쪽에 탐색 트리가 있는 것이 편하므로 “with navigation panel”에 체크를 했습니다.


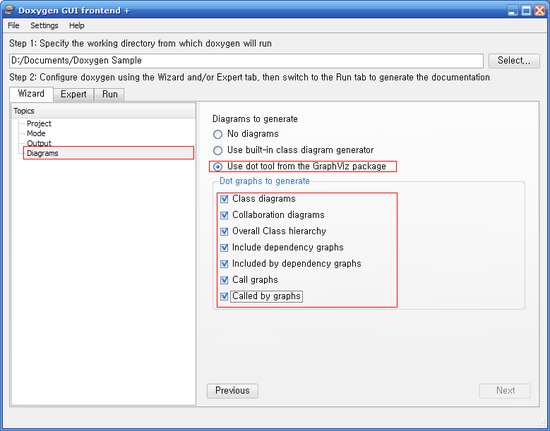
[ Wizard >> Diagrams ]


Use dot tool from the GraphViz package

 Doxygen에서 소스간의 관계를 그래프로 출력해 주는 기능이 있습니다. 그래프로 출력해주는 기능을 Dot Tool 이라고 하더군요. 당연히 관계 그래프가 출력되는 것이 좋으므로 모든 옵션을 체크했습니다


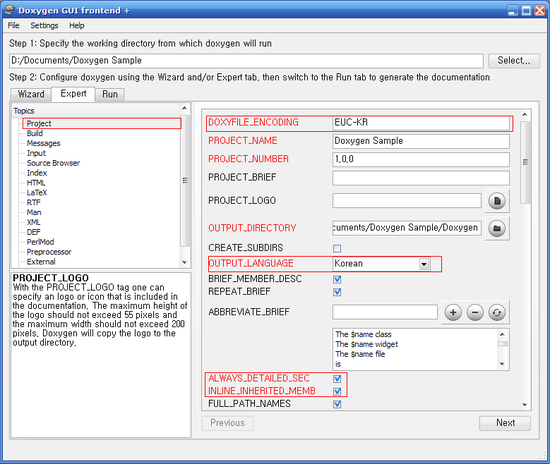
[ Expert >> Project ]


DOXYFILE_ENCODING

한글사용시 한글이 깨지는 것을 막기 위해 “EUC-KR”로 변경합니다.


OUTPUT_LANGUAGE

출력 결과에 쓰여질 언어를 선택합니다.


ALWAYS_DETAILED_SEC

항상 상세정보를 보여줍니다. REPEAT_BRIEF와 같이 선택하게되면 개략 정보가 없어도 상세정보 영역을 생성하게 됩니다.


INLINE_INHERITED_MEMB

생성자와 소멸자를 제외한 상속된 모든 멤버들을 보여줍니다.


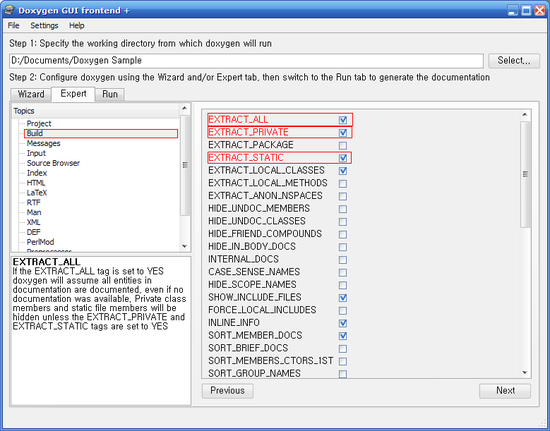
[ Expert >> Build ]


EXTRACT_ALL

이 항목을 체크 하시면 소스코드 내의 모든 요소가 문서화 대상이 됩니다.

하지만 EXTRACT_PRIVATE EXTRACT_STATIC에 체크돼 있지 않으면 private 멤버와 static 멤버는 문서화 되지 않습니다.


EXTRACT_PRIVATE

이 항목을 체크 하시면 클래스내의 모든 private 멤버가 문서화 대상이 됩니다.


EXTRACT_STATIC

이 항목을 체크 하시면 클래스내의 모든 static 멤버가 문서화 대상이 됩니다.


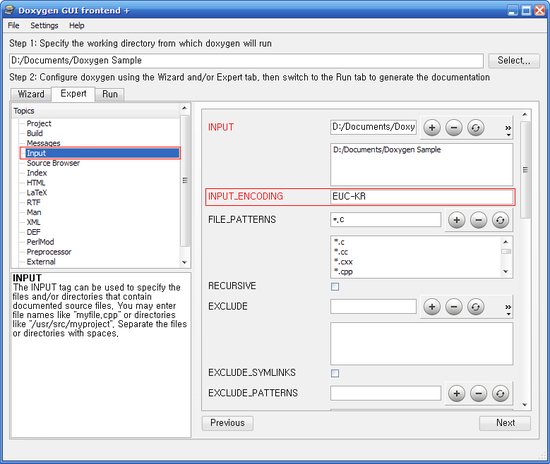
[ Expert >> Input ]


INPUT_ENCODING
한글이 깨지는 문제를 피하기 위해 “EUC-KR”로 변경합니다.


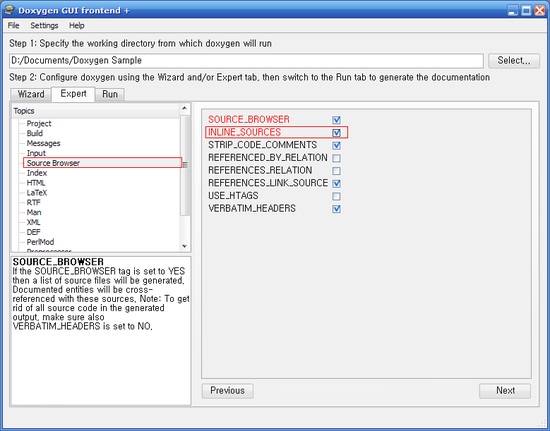
[ Expert >> Source Browser ]


INLINE_SOURCES 

이 항목을 체크 하시면 함수 설명에서 함수 소스코드가 들어가게 됩니다.


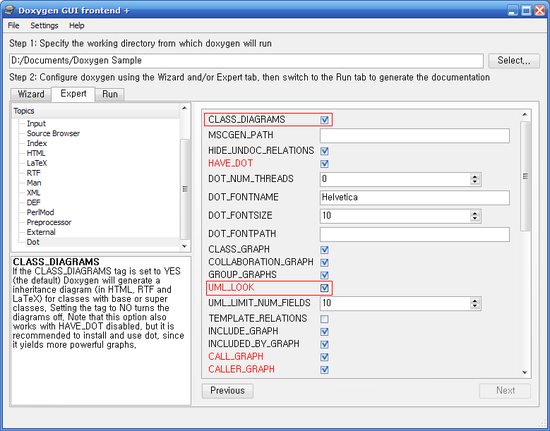
[ Expert >> Dot ]


ClASS_DIAGRAMS

클래스의 상속구조 다이어그램으로 그립니다.


UML_LOOK

다이어그램을 UML 형식으로 그립니다.


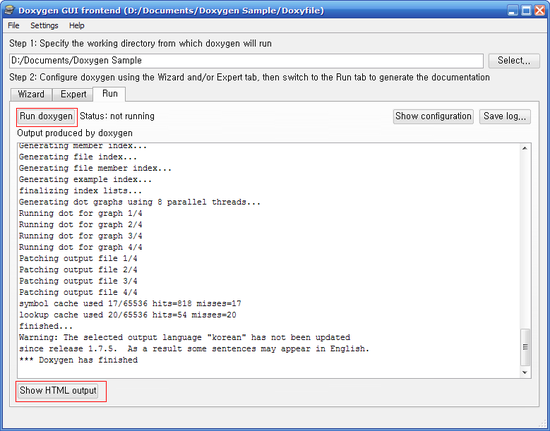
Run ]


Run doxygen

이 버튼을 클릭하시면 Doxygen 문서가 생성됩니다.


Show HTML output

Doxygen has finished 가 되었다면 이버튼을 통해 HTML을 볼수 있습니다.

이미 새성된 HTML은 Destinatione diectory 로 지정한 디렉토리 밑에 “html” 디렉토리가 있으며, 그안의 "index.html" 을 이용하여 HTML을 보셔도 됩니다.


이 설정 내용은 Doxygen 메뉴의 File >> Save 를 통해 저장하시면 소스 코드 변경후에 File >> Open 을 통하여 설정내용을 불러와서 그대로 다시 문서를 생성할수 있습니다.


이상 Doxygen 설정 방법 및 문서생성에 관한 글을 마치도록 하겠습니다. 


http://blog.naver.com/gepanow/130147573849


Posted by 장안동베짱e :


- 명령어 wevtutil.exe cl <LogName>


- 사용방법 wevtutil.exe cl "Application" & wevtutil.exe cl "Security" & wevtutil.exe cl "Setup" & wevtutil.exe cl "System" & wevtutil.exe cl "Microsoft-Windows-TerminalServices-RemoteConnectionManager/Operational"


http://cleverdj.tistory.com/102


Posted by 장안동베짱e :


Introduction

Apache Nutch is an open source Web crawler written in Java. By using it, we can find Web page hyperlinks in an automated manner, reduce lots of maintenance work, for example checking broken links, and create a copy of all the visited pages for searching over. That’s where Apache Solr comes in. Solr is an open source full text search framework, with Solr we can search the visited pages from Nutch. Luckily, integration between Nutch and Solr is pretty straightforward as explained below.

Apache Nutch supports Solr out-the-box, greatly simplifying Nutch-Solr integration. It also removes the legacy dependence upon both Apache Tomcat for running the old Nutch Web Application and upon Apache Lucene for indexing. Just download a binary release from here.


Table of Contents

Steps

This tutorial describes the installation and use of Nutch 1.x (current release is 1.7). How to compile and set up Nutch 2.x with HBase, see Nutch2Tutorial.


1. Setup Nutch from binary distribution

  • Download a binary package (apache-nutch-1.X-bin.zip) from here.

  • Unzip your binary Nutch package. There should be a folder apache-nutch-1.X.

  • cd apache-nutch-1.X/

From now on, we are going to use ${NUTCH_RUNTIME_HOME} to refer to the current directory (apache-nutch-1.X/).

Set up from the source distribution

Advanced users may also use the source distribution:

  • Download a source package (apache-nutch-1.X-src.zip)

  • Unzip
  • cd apache-nutch-1.X/

  • Run ant in this folder (cf. RunNutchInEclipse)

  • Now there is a directory runtime/local which contains a ready to use Nutch installation.

When the source distribution is used ${NUTCH_RUNTIME_HOME} refers to apache-nutch-1.X/runtime/local/. Note that

  • config files should be modified in apache-nutch-1.X/runtime/local/conf/

  • ant clean will remove this directory (keep copies of modified config files)


2. Verify your Nutch installation

  • run "bin/nutch" - You can confirm a correct installation if you seeing similar to the following:

Usage: nutch COMMAND where command is one of:
crawl             one-step crawler for intranets (DEPRECATED)
readdb            read / dump crawl db
mergedb           merge crawldb-s, with optional filtering
readlinkdb        read / dump link db
inject            inject new urls into the database
generate          generate new segments to fetch from crawl db
freegen           generate new segments to fetch from text files
fetch             fetch a segment's pages

Some troubleshooting tips:

  • Run the following command if you are seeing "Permission denied":

chmod +x bin/nutch
  • Setup JAVA_HOME if you are seeing JAVA_HOME not set. On Mac, you can run the following command or add it to ~/.bashrc:

export JAVA_HOME=/System/Library/Frameworks/JavaVM.framework/Versions/1.6/Home

On Debian or Ubuntu, you can run the following command or add it to ~/.bashrc:

export JAVA_HOME=$(readlink -f /usr/bin/java | sed "s:bin/java::")


3. Crawl your first website

  • Add your agent name in the value field of the http.agent.name property in conf/nutch-site.xml, for example:

<property>
 <name>http.agent.name</name>
 <value>My Nutch Spider</value>
</property>
  • mkdir -p urls

  • cd urls

  • touch seed.txt to create a text file seed.txt under urls/ with the following content (one URL per line for each site you want Nutch to crawl).

http://nutch.apache.org/
  • Edit the file conf/regex-urlfilter.txt and replace

# accept anything else
+.

with a regular expression matching the domain you wish to crawl. For example, if you wished to limit the crawl to the nutch.apache.org domain, the line should read:

 +^http://([a-z0-9]*\.)*nutch.apache.org/

This will include any URL in the domain nutch.apache.org.


3.1 Using the Crawl Command

The crawl command is deprecated. Please see section 3.3 on how to use the crawl script that is intended to replace the crawl command.

Now we are ready to initiate a crawl, use the following parameters:

  • -dir dir names the directory to put the crawl in.

  • -threads threads determines the number of threads that will fetch in parallel.

  • -depth depth indicates the link depth from the root page that should be crawled.

  • -topN N determines the maximum number of pages that will be retrieved at each level up to the depth.

  • Run the following command:

bin/nutch crawl urls -dir crawl -depth 3 -topN 5
  • Now you should be able to see the following directories created:

crawl/crawldb
crawl/linkdb
crawl/segments

NOTE: If you have a Solr core already set up and wish to index to it, you are required to add the -solr <solrUrl> parameter to your crawl command e.g.

bin/nutch crawl urls -solr http://localhost:8983/solr/ -depth 3 -topN 5

If not then please skip to here for how to set up your Solr instance and index your crawl data.

Typically one starts testing one's configuration by crawling at shallow depths, sharply limiting the number of pages fetched at each level (-topN), and watching the output to check that desired pages are fetched and undesirable pages are not. Once one is confident of the configuration, then an appropriate depth for a full crawl is around 10. The number of pages per level (-topN) for a full crawl can be from tens of thousands to millions, depending on your resources.


3.2 Using Individual Commands for Whole-Web Crawling

NOTE: If you previously modified the file conf/regex-urlfilter.txt as covered here you will need to change it back.

Whole-Web crawling is designed to handle very large crawls which may take weeks to complete, running on multiple machines. This also permits more control over the crawl process, and incremental crawling. It is important to note that whole Web crawling does not necessarily mean crawling the entire World Wide Web. We can limit a whole Web crawl to just a list of the URLs we want to crawl. This is done by using a filter just like we the one we used when we did the crawl command (above).

Step-by-Step: Concepts

Nutch data is composed of:

  1. The crawl database, or crawldb. This contains information about every URL known to Nutch, including whether it was fetched, and, if so, when.
  2. The link database, or linkdb. This contains the list of known links to each URL, including both the source URL and anchor text of the link.
  3. A set of segments. Each segment is a set of URLs that are fetched as a unit. Segments are directories with the following subdirectories:
    • crawl_generate names a set of URLs to be fetched

    • crawl_fetch contains the status of fetching each URL

    • content contains the raw content retrieved from each URL

    • parse_text contains the parsed text of each URL

    • parse_data contains outlinks and metadata parsed from each URL

    • crawl_parse contains the outlink URLs, used to update the crawldb

Step-by-Step: Seeding the crawldb with a list of URLs

Option 1: Bootstrapping from the DMOZ database.

The injector adds URLs to the crawldb. Let's inject URLs from the DMOZ Open Directory. First we must download and uncompress the file listing all of the DMOZ pages. (This is a 200+ MB file, so this will take a few minutes.)

wget http://rdf.dmoz.org/rdf/content.rdf.u8.gz
gunzip content.rdf.u8.gz

Next we select a random subset of these pages. (We use a random subset so that everyone who runs this tutorial doesn't hammer the same sites.) DMOZ contains around three million URLs. We select one out of every 5,000, so that we end up with around 1,000 URLs:

mkdir dmoz
bin/nutch org.apache.nutch.tools.DmozParser content.rdf.u8 -subset 5000 > dmoz/urls

The parser also takes a few minutes, as it must parse the full file. Finally, we initialize the crawldb with the selected URLs.

bin/nutch inject crawl/crawldb dmoz

Now we have a Web database with around 1,000 as-yet unfetched URLs in it.

Option 2. Bootstrapping from an initial seed list.

This option shadows the creation of the seed list as covered here.

bin/nutch inject crawl/crawldb urls

Step-by-Step: Fetching

To fetch, we first generate a fetch list from the database:

bin/nutch generate crawl/crawldb crawl/segments

This generates a fetch list for all of the pages due to be fetched. The fetch list is placed in a newly created segment directory. The segment directory is named by the time it's created. We save the name of this segment in the shell variable s1:

s1=`ls -d crawl/segments/2* | tail -1`
echo $s1

Now we run the fetcher on this segment with:

bin/nutch fetch $s1

Then we parse the entries:

bin/nutch parse $s1

When this is complete, we update the database with the results of the fetch:

bin/nutch updatedb crawl/crawldb $s1

Now the database contains both updated entries for all initial pages as well as new entries that correspond to newly discovered pages linked from the initial set.

Now we generate and fetch a new segment containing the top-scoring 1,000 pages:

bin/nutch generate crawl/crawldb crawl/segments -topN 1000
s2=`ls -d crawl/segments/2* | tail -1`
echo $s2

bin/nutch fetch $s2
bin/nutch parse $s2
bin/nutch updatedb crawl/crawldb $s2

Let's fetch one more round:

bin/nutch generate crawl/crawldb crawl/segments -topN 1000
s3=`ls -d crawl/segments/2* | tail -1`
echo $s3

bin/nutch fetch $s3
bin/nutch parse $s3
bin/nutch updatedb crawl/crawldb $s3

By this point we've fetched a few thousand pages. Let's invert links and index them!

Before indexing we first invert all of the links, so that we may index incoming anchor text with the pages.

bin/nutch invertlinks crawl/linkdb -dir crawl/segments

We are now ready to search with Apache Solr.

Step-by-Step: Indexing into Apache Solr

Note: For this step you should have Solr installation. If you didn't integrate Nutch with Solr. You should read here.

Now we are ready!!! To go on and index the all the resources. For more information see this paper

     Usage: bin/nutch solrindex <solr url> <crawldb> [-linkdb <linkdb>][-params k1=v1&k2=v2...] (<segment> ...| -dir <segments>) [-noCommit] [-deleteGone] [-filter] [-normalize]
     Example: bin/nutch solrindex http://localhost:8983/solr crawl/crawldb/ -linkdb crawl/linkdb/ crawl/segments/20131108063838/ -filter -normalize

Step-by-Step: Deleting Duplicates

Once indexed the entire contents, it must be disposed of duplicate urls in this way ensures that the urls are unique.

MapReduce:

  • Map: Identity map where keys are digests and values are SolrRecord instances (which contain id, boost and timestamp)

  • Reduce: After map, SolrRecords with the same digest will be grouped together. Now, of these documents with the same digests, delete all of them except the one with the highest score (boost field). If two (or more) documents have the same score, then the document with the latest timestamp is kept. Again, every other is deleted from solr index.

     Usage: bin/nutch solrdedup <solr url>
     Example: /bin/nutch solrdedup http://localhost:8983/solr

Step-by-Step: Cleaning Solr

The class scans a crawldb directory looking for entries with status DB_GONE (404) and sends delete requests to Solr for those documents. Once Solr receives the request the aforementioned documents are duly deleted. This maintains a healthier quality of Solr index.

     Usage: bin/nutch solrclean <crawldb> <solrurl>
     Example: /bin/nutch solrclean crawl/crawldb/ http://localhost:8983/solr


3.3. Using the crawl script

If you have followed the 3.2 section above on how the crawling can be done step by step, you might be wondering how a bash script can be written to automate all the process described above.

Nutch developers have written one for you :), and it is available at bin/crawl.

     Usage: bin/crawl <seedDir> <crawlID> <solrURL> <numberOfRounds>
     Example: bin/crawl urls/seed.txt TestCrawl http://localhost:8983/solr/ 2
     Or you can use:
     Example: bin/nutch crawl urls -solr http://localhost:8983/solr/ -depth 3 -topN 5

The crawl script has lot of parameters set, and you can modify the parameters to your needs. It would be ideal to understand the parameters before setting up big crawls.

  • download binary file from here

  • unzip to $HOME/apache-solr-3.X, we will now refer to this as ${APACHE_SOLR_HOME}

  • cd ${APACHE_SOLR_HOME}/example

  • java -jar start.jar


5. Verify Solr installation

After you started Solr admin console, you should be able to access the following links:

http://localhost:8983/solr/#/


6. Integrate Solr with Nutch

We have both Nutch and Solr installed and setup correctly. And Nutch already created crawl data from the seed URL(s). Below are the steps to delegate searching to Solr for links to be searchable:

  • mv ${APACHE_SOLR_HOME}/example/solr/conf/schema.xml ${APACHE_SOLR_HOME}/example/solr/conf/schema.xml.org
  • cp ${NUTCH_RUNTIME_HOME}/conf/schema.xml ${APACHE_SOLR_HOME}/example/solr/conf/

  • vi ${APACHE_SOLR_HOME}/example/solr/conf/schema.xml
  • Copy exactly in 351 line: <field name="_version_" type="long" indexed="true" stored="true"/>

  • restart Solr with the command “java -jar start.jar” under ${APACHE_SOLR_HOME}/example

  • run the Solr Index command:

bin/nutch solrindex http://127.0.0.1:8983/solr/ crawl/crawldb -linkdb crawl/linkdb crawl/segments/*

The call signature for running the solrindex has changed. The linkdb is now optional, so you need to denote it with a "-linkdb" flag on the command line.

This will send all crawl data to Solr for indexing. For more information please see bin/nutch solrindex

If all has gone to plan, we are now ready to search with http://localhost:8983/solr/admin/. If you want to see the raw HTML indexed by Solr, change the content field definition in schema.xml to:

<field name="content" type="text" stored="true" indexed="true"/>

NutchTutorial (last edited 2013-11-30 11:02:17 by talat)


http://wiki.apache.org/nutch/NutchTutorial


Posted by 장안동베짱e :


win-get(windows-get)

win-get is an automated install system and software repository for Microsoft Windows written in pascal (for the command line client) and php for the online repository. The ideas for its creation come from apt-get and other related tools for the *nix platforms.


The system works by connecting to a link repository. Finding an application and downloading it from the stored link using wget.exe . Then performing the installation routine (silent or standard). And finnally deleting the install file.


Installation: 1. Download wget.exe 2. Download win-get.exe (version 1.01) 3. Put the 2 files some where on your system (I like in the c:\windows so they are system wide accessible). *** If you are upgrading to the 1.x version from any previous version you must delete your win-get.conf file and allow win-get to recreate it!! *** Questions, Comments, Bug-reports? visit the sourceforge site at: http://sourceforge.net/projects/windows-get or email me ryan.proctor@gmail.com You can view the current changelog here: changelog.txt

내용


http://windows-get.sourceforge.net/


Posted by 장안동베짱e :


# Python 라이브러리

optparse : 커멘드라인에서 옵션을 처리하기 위한 라이브러리

python-nmap : python에서 nmap 을 사용할수 있는 라이브러리

pexpect : 프로그램 작동, 프로그램의 결과 받아서 자동화를 할수 있는 라이브러리(이책에서는 ssh 접속 자동화를 위해 사용)

pxssh : pexpect라이브러리에 있는 ssh 세션과 직접 연동할 스크립트

ftplib : ftp라이브러리

_winreg : 윈도우 레지스트리를 읽기위한 라이브러리

mechanize : 웹 자동화 라이브러리

pyPDF : PDF 문서 관리 라이브러리

exiftool : Exif 정보 라이브러리

beutifulsoup4 : html, xml 의 구문분석 라이브러리

PIL : 파이선 이미지 라이브러리

sqlite3 : sqlite3 라이브러리

pyGeoIP : GeoLiteCity 데이터베이스를 쿼리 할수 있는 라이브러리

dpkt, scapy : 패킷분석을 위한 라이브러리

python-bluez : 파이선 블루투스 라이브러리

cookielib : 쿠키를 처리할수 있는 라이브러리

smtplib : smtp 라이브러리

ctype : C스타일 코드를 작성하기 위한 ctype 라이브러리


: python-nmap pexpect pxssh ftplib _winreg mechanize pyPDF exiftool beutifulsoup4 PIL sqlite3 pyGeoIP dpkt, scapy python-bluez cookielib smtplib ctype


Posted by 장안동베짱e :


Place

Web

Description

Formats

www.skullsecurity.org

On the web you can find the 500 pass most used variety of dictionaries (languages, actors, porn, etc ...), names from facebook, also lists the location of files (linux, windows), extensions of web applications (phpmyadmin, apache, phpbb etc ...), it is certainly the most comprehensive web I've seen to find the specific dictionary for brute force we seek.

*.txt.bz2 *.txt

www.insidepro.com

Brings dictionaries by language and some made by the same web site (InsidePro), also brings the mythical dictionary and one of hashkiller.com milw0rm.com, and also brings a compact with the names of Facebook. I personally really like that is neat and clear the site.

* Rar -.> * Dic.

packetstormsecurity.org

Here you can find dictionaries that comes to mind (asteroids, rock, myths and legends, cinema, jazz, names, etc ...). The only problem is you have to look at a long list with no logical order.

*.txt *.txt.gz

www.cotse.com (1) 
www.cotse.com (2)

A website that offers many topics: common passwords, the terms of Street Drugs, host names, the words of the King James Bible, Latin words, Minix / usr / dict, names of movies, classical music, country music, jazz, other music, rock music, musicals, myths and legends, names of players, player names, surnames whites, among many others. Just a bit annoying clutter.

*

ftp.ox.ac.uk

FTP bring a wide variety of dictionaries by language, some literature, movieTV, music, names, etc ...

*. Z *. Gz

ftp.openwall.com

This is the FTP known that brings Openwall passwords compact and a wide variety of dictionaries for languages.

*.gz

ftp.cerias.purdue.edu

FTP much like the previous two it brings among its varieties: language, literature, movieTV, places, names, random, religion, computer, science.

*.gz

vxchaos.official.ws

This is a server that collects many files relating to "hack", and in its wordlist section is extensive and varied a collection of dictionaries to brute force, the only problem is that you can download many at a time, have many formats and are very messy.

. * Zip *. Txt.gz *. Dic *. Txt *. Gz *. Rar. * Zip *. Z

ftp.zedz.net

FTP with varied number of dictionaries (languages, actors, movies, names, etc ...)

*

10°

contest.korelogic.com

Here you can locate an dictionaries with 2 letter combinations, city names, football teams, names from Facebook, Words from the Wiki (depending on language), etc ...

*. * December. Dic.gz *. Txt

11°

www.leetupload.com

This is another collection diccinarios server.

*. Zip *. Rare. Txt

12°

ftp.funet.fi

FTP with dictionaries for languages.

*. Z *

13°

wordlist.sourceforge.net

Here's a little collection complete, but equally useful.

*.tar.gz *.zip

14°

article7.org

Here you can find a handful of dictionaries.

*txt *.zip

15°

www.nomorecrypto.com

We provide a torrent with a dictionary of 31 GB or more, no less.

*txt *.zip


Bonus Track 1:


Well, no need to do brute force if they have the default passwords that come in router, telnet, HTTP, etc ... That are these 3 sites:


Place

Web

Description

www.vulnerabilityassessment.co.uk

The largest collection of default passwords on all services and models, and are ordered by alphabet: Z |Numeric | AS400 Default Accounts | Oracle Default Passwords

www.phenoelit-us.org

Default password list many authentication services. It ran a single list.

www.indianz.ch

List Previous much like, but it seems a little less full.

                                                                                                   
Bonus Track 2:


And there are not only gross Force passwords, but also for system files, Apache, Oracle, CGI, etc ... That's what this website brings many statements apart for SQLi and XSS:

http://yehg.net/


http://osysleo.blogspot.kr/2013/01/dictionaries-brute-force-brute-force.html


Posted by 장안동베짱e :

01 시작

The dependencies page lists all the jars that you will need to have in your classpath.

The class com.gargoylesoftware.htmlunit.WebClient is the main starting point. This simulates a web browser and will be used to execute all of the tests.

Most unit testing will be done within a framework like JUnit so all the examples here will assume that we are using that.

In the first sample, we create the web client and have it load the homepage from the HtmlUnit website. We then verify that this page has the correct title. Note that getPage() can return different types of pages based on the content type of the returned data. In this case we are expecting a content type of text/html so we cast the result to an com.gargoylesoftware.htmlunit.html.HtmlPage.


@Test

public void homePage() throws Exception {

    final WebClient webClient = new WebClient();

    final HtmlPage page = webClient.getPage("http://htmlunit.sourceforge.net");

    Assert.assertEquals("HtmlUnit - Welcome to HtmlUnit", page.getTitleText());


    final String pageAsXml = page.asXml();

    Assert.assertTrue(pageAsXml.contains("<body class=\"composite\">"));


    final String pageAsText = page.asText();

    Assert.assertTrue(pageAsText.contains("Support for the HTTP and HTTPS protocols"));


    webClient.closeAllWindows();

}


Often you will want to simulate a specific browser. This is done by passing a com.gargoylesoftware.htmlunit.BrowserVersion into the WebClient constructor. Constants have been provided for some common browsers but you can create your own specific version by instantiating a BrowserVersion.


@Test

public void homePage_Firefox() throws Exception {

    final WebClient webClient = new WebClient(BrowserVersion.FIREFOX_17);

    final HtmlPage page = webClient.getPage("http://htmlunit.sourceforge.net");

    Assert.assertEquals("HtmlUnit - Welcome to HtmlUnit", page.getTitleText());


    webClient.closeAllWindows();

}


Specifying this BrowserVersion will change the user agent header that is sent up to the server and will change the behavior of some of the JavaScript.

Once you have a reference to an HtmlPage, you can search for a specific HtmlElement by one of 'get' methods, or by using XPath.

Below is an example of finding a 'div' by an ID, and getting an anchor by name:


@Test

public void getElements() throws Exception {

    final WebClient webClient = new WebClient();

    final HtmlPage page = webClient.getPage("http://some_url");

    final HtmlDivision div = page.getHtmlElementById("some_div_id");

    final HtmlAnchor anchor = page.getAnchorByName("anchor_name");


    webClient.closeAllWindows();

}


XPath is the suggested way for more complex searches, a brief tutorial can be found in W3Schools


@Test

public void xpath() throws Exception {

    final WebClient webClient = new WebClient();

    final HtmlPage page = webClient.getPage("http://htmlunit.sourceforge.net");


    //get list of all divs

    final List<?> divs = page.getByXPath("//div");


    //get div which has a 'name' attribute of 'John'

    final HtmlDivision div = (HtmlDivision) page.getByXPath("//div[@name='John']").get(0);


    webClient.closeAllWindows();

}


The last WebClient constructor allows you to specify proxy server information in those cases where you need to connect through one.


@Test

public void homePage_proxy() throws Exception {

    final WebClient webClient = new WebClient(BrowserVersion.FIREFOX_10, "http://myproxyserver", myProxyPort);


    //set proxy username and password

    final DefaultCredentialsProvider credentialsProvider = (DefaultCredentialsProvider) webClient.getCredentialsProvider();

    credentialsProvider.addCredentials("username", "password");


    final HtmlPage page = webClient.getPage("http://htmlunit.sourceforge.net");

    Assert.assertEquals("HtmlUnit - Welcome to HtmlUnit", page.getTitleText());


    webClient.closeAllWindows();

}


Specifying this BrowserVersion will change the user agent header that is sent up to the server and will change the behavior of some of the JavaScript.


Frequently we want to change values in a form and submit the form back to the server. The following example shows how you might do this.


@Test

public void submittingForm() throws Exception {

    final WebClient webClient = new WebClient();


    // Get the first page

    final HtmlPage page1 = webClient.getPage("http://some_url");


    // Get the form that we are dealing with and within that form,

    // find the submit button and the field that we want to change.

    final HtmlForm form = page1.getFormByName("myform");


    final HtmlSubmitInput button = form.getInputByName("submitbutton");

    final HtmlTextInput textField = form.getInputByName("userid");


    // Change the value of the text field

    textField.setValueAttribute("root");


    // Now submit the form by clicking the button and get back the second page.

    final HtmlPage page2 = button.click();


    webClient.closeAllWindows();

}


02 키보드 사용

For a given WebClient, the focus can be on at most one element at any given time. Focus doesn't have to be on any element within the WebClient.

There are several ways to move the focus from one element to another. The simplest is to call HtmlPage.setFocusedElement(HtmlElement). This method will remove focus from whatever element currently has it, if any, and will set it to the new component. Along the way, it will fire off any "onfocus" and "onblur" handlers that have been defined.

The element currently owning the focus can be determined with a call to HtmlPage.getFocusedElement().

To simulate keyboard navigation via the tab key, you can call HtmlPage.tabToNextElement() and HtmlPage.tabToPreviousElement() to cycle forward or backwards through the defined tab order. This tab order is defined by the tabindex attribute on the various elements as defined by the HTML specification. You can query the defined tab order with the method HtmlPage.getTabbableElements() which will return a list of all tabbable elements in defined tab order.

Access keys, often called keyboard mnemonics, can be simulated with the method HtmlPage.pressAccessKey(char).

To use special keys, you can use htmlElement.type(int) with KeyboardEvent.DOM_VK_PAGE_DOWN.

Finally, there is an assertion for testing that will verify that every tabbable element has a defined tabindex attribute. This is done with WebAssert.assertAllTabIndexAttributesSet().


03 테이블 사용

The first set of examples will use this simple html.


<html><head><title>Table sample</title></head><body>

    <table id="table1">

        <tr>

            <th>Number</th>

            <th>Description</th>

        </tr>

        <tr>

            <td>5</td>

            <td>Bicycle</td>

        </tr>

    </table>

</body></html>


This example shows how to iterate over all the rows and cells


final HtmlTable table = page.getHtmlElementById("table1");

for (final HtmlTableRow row : table.getRows()) {

    System.out.println("Found row");

    for (final HtmlTableCell cell : row.getCells()) {

        System.out.println("   Found cell: " + cell.asText());

    }

}


The following sample shows how to access specific cells by row and column


final WebClient webClient = new WebClient();

final HtmlPage page = webClient.getPage("http://foo.com");


final HtmlTable table = page.getHtmlElementById("table1");

System.out.println("Cell (1,2)=" + table.getCellAt(1,2));


The next examples will use a more complicated table that includes table header, footer and body sections as well as a caption


<html><head><title>Table sample</title></head><body>

    <table id="table1">

        <caption>My complex table</caption>

        <thead>

            <tr>

                <th>Number</th>

                <th>Description</th>

            </tr>

        </thead>

        <tfoot>

            <tr>

                <td>7</td>

                <td></td>

            </tr>

        </tfoot>

        <tbody>

            <tr>

                <td>5</td>

                <td>Bicycle</td>

            </tr>

        </tbody>

        <tbody>

            <tr>

                <td>2</td>

                <td>Tricycle</td>

            </tr>

        </tbody>

    </table>

</body></html>


HtmlTableHeader, HtmlTableFooter and HtmlTableBody sections are groupings of rows. There can be at most one header and one footer but there may be more than one body. Each one of these contains rows which can be accessed via getRows()


final HtmlTableHeader header = table.getHeader();

final List<HtmlTableRow> headerRows = header.getRows();


final HtmlTableFooter footer = table.getFooter();

final List<HtmlTableRow> footerRows = footer.getRows();


for (final HtmlTableBody body : table.getBodies()) {

    final List<HtmlTableRow> rows = body.getRows();

    ...

}

Every table may optionally have a caption element which describes it.

final String caption = table.getCaptionText()


04 프레임(frame / iframe)사용

Getting the page inside <frame> element or <iframe> element can be done by using HtmlPage.getFrames().
Suppose you have the following page:

<html>
  <body>
    <iframe src="two.html">
  </body>
</html>

You can use the following code to get the content of two.html:

final List<FrameWindow> window = page.getFrames();
final HtmlPage pageTwo = (HtmlPage) window.get(0).getEnclosedPage();

Another example that navigates API docs to get a desired page of a class:

final WebClient client = new WebClient();
final HtmlPage mainPage = client.getPage("http://htmlunit.sourceforge.net/apidocs/index.html");

To get the page of the first frame (at upper left) and click the sixth link:

final HtmlPage packageListPage = (HtmlPage) mainPage.getFrames().get(0).getEnclosedPage();
packageListPage.getAnchors().get(5).click();

To get the page of the frame named 'packageFrame' (at lower left) and click the second link:

final HtmlPage pakcagePage = (HtmlPage) mainPage.getFrameByName("packageFrame").getEnclosedPage();
pakcagePage.getAnchors().get(1).click();

To get the page of the frame named 'classFrame' (at right):

final HtmlPage classPage = (HtmlPage) mainPage.getFrameByName("classFrame").getEnclosedPage();


05 윈도우 사용

All pages are contained within WebWindow objects. This could be a TopLevelWindow representing an actual browser window, an HtmlFrame representing a <frame> element or an HtmlInlineFrame representing an <iframe> element.

When a WebClient is first instantiated, a TopLevelWindow is automatically created. You could think of this as being the first window displayed by a web browser. Calling WebClient.getPage(WebWindow, WebRequest) will load the new page into this window.

The JavaScript open() function can be used to load pages into other windows. New WebWindow objects will be created automatically by this function.


If you wish to be notified when windows are created or pages are loaded, you need to register a WebWindowListener with the WebClient via the method WebClient.addWebWindowListener(WebWindowListener)

When a window is opened either by JavaScript or through the WebClient, a WebWindowEvent will be fired and passed into the WebWindowListener.webWindowOpened(WebWindowEvent) method. Note that both the new and old pages in the event will be null as the window does not have any content loaded at this point. If a URL was specified during creation of the window then the page will be loaded and another event will be fired as described below.

When a new page is loaded into a specific window, a WebWindowEvent will be fired and passed into the WebWindowListener.webWindowContentChanged(WebWindowEvent) method.


06 JavaScript 사용

A frequent question we get is "how do I test my JavaScript?". There is nothing really specific for using JavaScript, it is automatically processed. So, you just need to .getPage(), find the element to click(), and then check the result. Tests for complex JavaScript libraries are included in HtmlUnit test base, you can find it here which is useful to get an idea.

Usually, you should wait() or sleep() a little, as HtmlUnit can finish before the AJAX response is retrieved from the server, please read this FAQ.

Below are some examples:


Lets say that we have a page containing JavaScript that will dynamically write content to the page. The following html will dynamically generate five textfields and place them inside a table. Each textfield will have a unique name created by appending the index to the string "textfield".

<html><head><title>Table sample</title></head><body>
    <form action='/foo' name='form1'>
    <table id="table1">
        <script type="text/javascript">
            for (i = 1; i <= 5; i++) {
                document.write("<tr><td>" + i
                    + "</td><td><input name='textfield" + i
                    + "' type='text'></td></tr>");
            }
        </script>
    </table></form>
</body></html>

We would likely want to test that the five text fields were created so we could start with this.

@Test
public void documentWrite() throws Exception {
    final WebClient webClient = new WebClient();
 
    final HtmlPage page = webClient.getPage("http://myserver/test.html");
    final HtmlForm form = page.getFormByName("form1");
    for (int i = 1; i <= 5; i++) {
        final String expectedName = "textfield" + i;
        Assert.assertEquals(
            "text", 
            form.<HtmlInput>getInputByName(expectedName).getTypeAttribute());
    }
}

We might also want to check off-by-one errors by ensuring that it didn't create "textfield0" or "textfield6". Trying to get an element that doesn't exist will cause an exception to be thrown so we could add this to the end of the previous test.

try {
    form.getInputByName("textfield0");
    fail("Expected an ElementNotFoundException");
}
catch (final ElementNotFoundException e) {
    // Expected path
}
 
try {
    form.getInputByName("textfield6");
    fail("Expected an ElementNotFoundException");
}
catch (final ElementNotFoundException e) {
    // Expected path
}

Often you want to watch alerts triggered by JavaScript.

<html><head><title>Alert sample</title></head>
<body onload='alert("foo");'>
</body></html>

Alerts are tracked by an AlertHandler which will be called whenever the JavaScript alert() function is called. In the following test, we register an alert handler which just saves all messages into a list. When the page load is complete, we compare that list of collected alerts with another list of expected alerts to ensure they are the same.

@Test
public void alerts() throws Exception {
    final WebClient webClient = new WebClient();
 
    final List collectedAlerts = new ArrayList();
    webClient.setAlertHandler(new CollectingAlertHandler(collectedAlerts));
 
    // Since we aren't actually manipulating the page, we don't assign
    // it to a variable - it's enough to know that it loaded.
    webClient.getPage("http://tciludev01/test.html");
 
    final List expectedAlerts = Collections.singletonList("foo");
    Assert.assertEquals(expectedAlerts, collectedAlerts);
}

Handling prompt dialogs, confirm dialogs and status line messages work in the same way as alerts. You register a handler of the appropriate type and it will get notified when that method is called. See WebClient.setPromptHandler(), WebClient.setConfirmHandler() and WebClient.setStatusHandler() for details on these.

Most event handlers are already implemented: onload, onclick, ondblclick, onmouseup, onsubmit, onreadystatechange, ... They will be triggered at the appropriate time just like in a "real browser".

If the event that you wish to test is not yet supported then you can directly invoke it through the ScriptEngine. Note that while the script engine is publicly accessible, we do not recommend using it directly unless you have no other choice. It is much better to manipulate the page as a user would by clicking on elements and shifting the focus around.


07 ActiveX 사용

Although HtmlUnit is a pure Java implementation that simulates browsers, there are some cases where platform-specific features require integration of other libraries, and ActiveX is one of them.

Internet Explorer on Windows can run arbitrary ActiveX components (provided that security level is lowered on purpose, if the user trusts the website). Neither HtmlUnit nor Internet Explorer has any control on the behavior of the run ActiveX, so you have to be careful before using that feature.


The current implementation depends on Jacob, and because it has .dll dependency, it was not uploaded to maven repository. The dependency is optional, i.e. Jacob jar is not needed for compiling or usual usage of HtmlUnit.

To use Jacob, add jacob.jar to the classpath and put the .dll in the path (java.library.path) so that the following code works for you:

final ActiveXComponent activeXComponent = new ActiveXComponent("InternetExplorer.Application");
final boolean busy = activeXComponent.getProperty("Busy").getBoolean();
System.out.println(busy);

The only thing needed is setting WebClient property:

webClient.getOptions().setActiveXNative(true);

and there you go!


Posted by 장안동베짱e :

1.Facebook api를 사용해서 글등록시 연속으로 등록 시 스팸방지 에러메세지가 뜨며 등록이 되지 않는다. 결국 Htmlunit 라이브러리를 이용하여 가상브라우져에서 등록하는 방식으로 구현하였슴


2. 개발에 유의한점은 

- html 을 단순화하여 분석하기 위해 모바일 페이지로 접속(m.facebook.com)

- 한글/영문등 언어별로 페이지가 다르게 나타나므로 한글페이지로 접속하도록 http header 강제 설정


3. 소스 

- 아래 소스에서 ID, PW를 facebook 계정으로 바꾸어 사용하면 됨

import java.util.List; import org.apache.log4j.Logger; import com.gargoylesoftware.htmlunit.BrowserVersion; import com.gargoylesoftware.htmlunit.WebClient; import com.gargoylesoftware.htmlunit.html.HtmlElement; import com.gargoylesoftware.htmlunit.html.HtmlForm; import com.gargoylesoftware.htmlunit.html.HtmlInput; import com.gargoylesoftware.htmlunit.html.HtmlPage; public class FacebookPost2 { private static Logger log = Logger.getLogger("facebook2"); public static void main(String[] args) throws Exception { new FacebookPost2().reg("", "test"); } public void reg(String title, String content) throws Exception{ String message = ""; message = content; WebClient webClient = new WebClient(BrowserVersion.INTERNET_EXPLORER_8); //브라우져 Header 설정 webClient.addRequestHeader("Accept-Language", "ko-KR,ko;q=0.8,en-US;q=0.6,en;q=0.4, value"); webClient.addRequestHeader("Accept-Charset", "windows-949,utf-8;q=0.7,*;q=0.3"); webClient.setThrowExceptionOnScriptError(true); webClient.getCookieManager().setCookiesEnabled(true); webClient.setJavaScriptEnabled(true); //페이지 접속 HtmlPage page = (HtmlPage) webClient.getPage("http://m.facebook.com"); List<htmlform> htmlf = page.getForms(); //1번째 Form HtmlForm form = htmlf.get(0); //ID/PW 설정 form.<htmlinput> getInputByName("email").setValueAttribute(ID); form.<htmlinput> getInputByName("pass").setValueAttribute(PW); page = (HtmlPage) form.getInputByName("login").click(); Thread.sleep(100); log.error("button click"); //글 등록 page.<htmlelement> getElementByName("status").focus(); page.<htmlelement> getElementByName("status").setTextContent(message); page.<htmlelement> getElementByName("update").click(); //브라우져 닫기 webClient.closeAllWindows(); } }</htmlelement></htmlelement></htmlelement></htmlinput></htmlinput></htmlform>

<< 위코드는 약간의 수정이 필요합니다>>


http://krazyhe.tistory.com/23


Posted by 장안동베짱e :

개발환경 : JDK 1.5, Junit 3, HtmlUnit 2.7,  window XP


HtmlUnit 은 WebApplication 개발시 브라우저에서 테스트하지 않고 Java

프로그램을 단위 테스트 해볼수 있는 framework 이다. javascript, Ajax 를 완벽하게 지원할 뿐만 아니라 Internet Explorer, Firefox 두개의 브라우저에서 테스트 해볼수 있다.


(1) 환경설정


이것의 주요 목적은 개발된 웹사이트의 단위테스트와 정보를 리턴받기 위함이다.

http://htmlunit.sourceforge.net/ 에 주요내용이 있으므로 참고하기 바란다.

일단 왼쪽에 downloads 를 클릭해 파일을 다운받는다. 파일안 lib 폴더에

의존적인 class 들이 있으므로 그대로 복사해서 쓰면 된다.


HtmlUnit 을 돌리기 위해서 어떤 jar 버전이 의존적인지 확인해 볼려면 다음 페이지로 가서 확인하면된다. http://htmlunit.sourceforge.net/dependencies.html


다운받은 jar 파일을 복사해넣고 간단히 테스트 프로그램을 만들어서 실행해보자.

HtmlUnit 을 테스트하기위해서는 Junit 프레임웍을 사용해야한다.

windows > Preferences > Java Build Path 로 들어간다. Libraries 탭을 클릭해서 설정화면으로 들어가자. 화면에서 오른쪽 버튼중 Add Library 를 클릭하게 되면 eclipse 에서 제공하는 라이브러리 패키지 리스트가 제공된다. 그중 Junit 을 선택하게 되면 Junit3, Junit4 중 하나를 선택하게 되는데 나는 이전부터 Junit3 가 익숙해져 있어서 3 를 선택했다.


(2) 테스트 클래스 제작


이제 Junit 클래스를 하나 만든다. junit.framework.TestCase 클래스를 상속받아 만드는데 함수실행을 위해서는 함수명 앞에 testXXX 형태로 이름을 만들어야 framework 이 인식하게 된다. 사이트에서 사용한 예제는 Junit4 를 기반으로 했기 때문에 @Test 어노테이션을 사용할수 있지만 Juit3 에서는 못하기 때문에 함수명을 textXXX 로 만들수 밖에 없다.


import junit.framework.TestCase; import com.gargoylesoftware.htmlunit.WebClient; import com.gargoylesoftware.htmlunit.html.HtmlPage; public class WebSubmit extends TestCase { public void testHomePage() throws Exception { final WebClient webClient = new WebClient(); final HtmlPage page = webClient.getPage("http://htmlunit.sourceforge.net"); assertEquals("HtmlUnit - Welcome to HtmlUnit", page.getTitleText()); final String pageAsXml = page.asXml(); assertTrue(pageAsXml.contains("")); final String pageAsText = page.asText(); assertTrue(pageAsText.contains("Support for the HTTP and HTTPS protocols")); } }

위 소스를 테스트 한 결과이다. 왼쪽에 보면 문제 없이 진행된 것을 볼수 있다.


그리고 로그를 확인해 보면 사이트로 전송받은 HTML 내용이 DEBUG 모드로

출력되어있는 것을 볼수 있다. Junit 은 기본적으로 Log4j 를 사용하기 때문에log4j 설정값이 들어있는 properties 를 패키지 제일 상단에 복사해 넣는다.


만약 log4j.properties 가 없다면 아래와 같은 에러가 날것이다. 그리고 HtmlUnit 에서 출력하는 상세로그를 확인할수 없어 디버그 하기 힘들다.

log4j:WARN No appenders could be found for logger (com.gargoylesoftware.htmlunit.WebClient).

log4j:WARN Please initialize the log4j system properly.


다음 테스트 내용은 브라우저에서 실행할 내용을 단위테스트 함수에서 실행하는 것이다. 보통 브라우저에서 회원가입이나 데이터를 입력해서 submit 을 해야되는 경우 할 때 마다 수많은 입력값을 넣어 테스트를 하고 실패했을 경우 다시 재입력해야되는 귀찮은 작업을 해야한다. 하지만 단위테스트 함수를 만들어 놓고 그 안에 입력값을 고정으로 해서 작업한다면 다시 재입력해야 되는 수고는 덜수 있을 뿐만 아니라 값을 넘기고 난 이후의 비즈니스 로직을 효과적이고 빠르게 테스트 해볼수 있을 것이다


public void testSubmittingForm() throws Exception {               final WebClient webClient = new WebClient();       // WAS 를 띄운다. 테스트 하고자 하는 페이지로 접근하여 데이타를 받아온다       final HtmlPage page1 = webClient.getPage("http://localhost:8080/test.html");       // HTML 에서 form 객체를 가져온다.       final HtmlForm form = page1.getFormByName("myform");             // Button 객체를 가져온다.       final HtmlSubmitInput button = form.getInputByName("button");       // Input text 객체를 가져온다.       final HtmlTextInput textField = form.getInputByName("userid");       textField.setValueAttribute("값변경"); // Input text 값을 변경한다.  

      // 버튼 클릭과 같은 기능을 한다. javascript 함수 호출이나 submit 기능을       // 구현해 놓았다면 그대로 실행될 것이다.       final HtmlPage page2 = button.click(); }


 http://mainia.tistory.com/529


Posted by 장안동베짱e :
웹폰트는 구독자의 컴퓨터에서도 글쓴 이가 설정한 폰트로 볼 수 있어 가독성이 뛰어난 장점이 있습니다.
특히 네이버에서 아름다운 한글 알리기를 위해 보급중인 나눔고딕은 모바일에서도 가독성이 뛰어납니다.
한편 구글 크롬은 IE, 사파리 등 다양한 브라우저 가운데 속도가 빠르고 편의성이 뛰어나 국내에서도 꾸준하게 사용자가 늘어나고 있는데요 이러한 구글 크롬과 네이버 나눔고딕이 만났을 떄 PC나 모바일에서 구독자의 가독성을 도와줄 수 있습니다.
다만 설치형블로그에만 적용이 가능해 네이버나 다음 등에서 제공하는 블로그가 아닌 티스토리, 이글루스 등의 블로그에만 적용이 가능한 점이 단점입니다.
아직 구글크롬을 사용해보지 않으신 분들은 구글 크롬 브라우저를 다운 받아 설치해야 하며 간편하게 설치 가능합니다. 아직 한번도 사용해보지 않으셨다면 이번 기회에 구글 크롬을 다운받아 사용해보시기 바랍니다.


구글 크롬 웹폰트로 나눔고딕 또는 나눔 폰트 적용하기
구글에서는 구글폰트를 통해서 나눔폰트를 적용할 수 있습니다. ▷ 구글 폰트 바로가기 ---> https://www.google.com/fonts/earlyaccess
① 구글폰트 페이지에 접속한 후 'ctrl+F' 단축키를 이용해 'Nanum'을 입력해 나눔폰트체를 찾습니다.


② 위 이미지처럼 빨간 네모박스 속의 나눔고딕링크를 내블로그 관리자-->Html/css--> style/css 최상단에 삽입합니다.


③ 다시 'ctrl+F' 단축키를 이용해 css/style에서 'font-family'를 찾아 'Nanaum Gothic'을 입력한 후 저장을 눌러줍니다.


④ 미리보기를 통해 폰트적용이 되었는지 확인합니다.


미리보기를 통해 확인하니 PC상에서 적용이 잘 된 것을 볼 수 있습니다. 모바일에서는 어떻게 보이는지 확인해 보면 아래와 같이 모바일에서 더 선명하게 잘 보이고 있음을 알 수 있습니다.


이제 웹폰트로 나눔고딕을 적용하여 내 글을 보는 구독자에게 보다 편안하게 글을 볼 수 있도록 하세요.


출처 http://poto1.tistory.com/234


Posted by 장안동베짱e :